Introduction:
Welcome to my little randomly updated project blogsite.
Costuming is sort of a hobby of mine and so Halloween is my official favorite holiday. I also enjoy conventions (though I've never had the time to do a proper costume for one, I'm hoping I will someday). Whenever I start brainstorming and working towards a new project, I like to jump online and web search to see if anyone else has done something similar to what I intend to accomplish. I pick brains and love viewing the tutorials other people have left behind. This is sort of my way of paying it forward ...
Here's to all the good ideas I've found from other people. And here's my trial-and-error method of recording what I accomplish.
The Blog:
This site will update periodically, sporadically, and randomly. Basically, only when I'm working on a project or think I have an idea for a new one.
As for organization purposes, if I have a new project added to the compendium, I will list it in the prospective sidebar spot as such:
Project/Costume (linking to the label that will pull up every post that relates)
- Project type
- Source/Character Origin
- Occasion/Year
I will try to remember to take photos as I work to supplement my description, though if you scroll down a bit you'll see this is very text-heavy. Although photos are helpful in showing the steps, there are certain details that will only be translated by word. I try to get progress shots as frequently as I can, but there are times where I'll get rolling and productive and it'll just go and be gone. The moment for photos will pass. Also, if I'm ever in a time crunch, I won't really be worried about pausing for a photo-op.
Anyway, thanks for checking out my little creative corner of the internet. Feel free to drop me a line or comment! I'm a busy girl (school, work, family, games!) but I'll respond as soon as I get a chance, I promise!
Saturday, January 3, 2037
Thursday, October 17, 2013
Home is Where the Hearthstone is
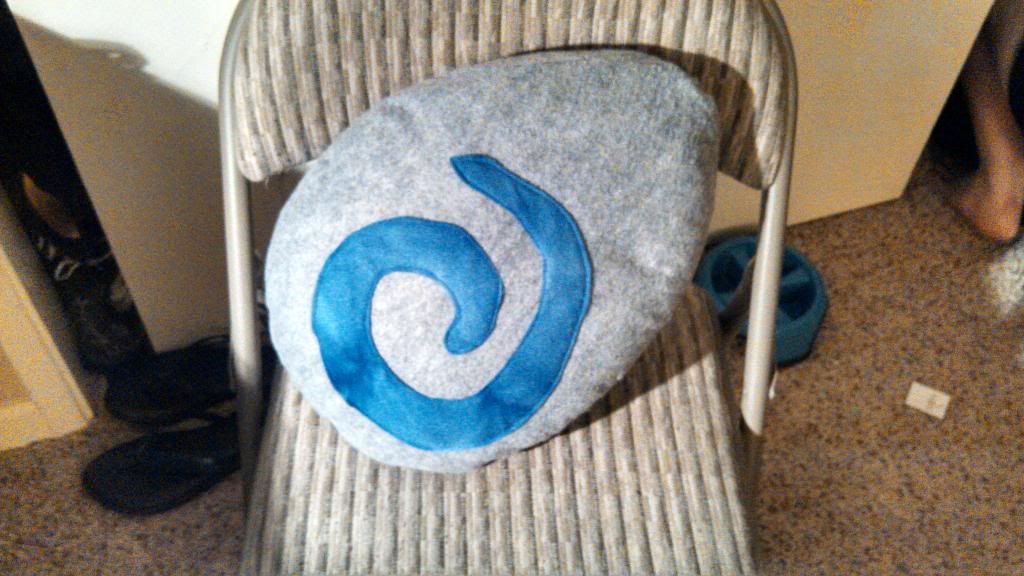
This was a quick project I did as a housewarming present for someone. I was foolish and didn't get many (ie. any) shots of the process. There's also really only two shots of the final product.
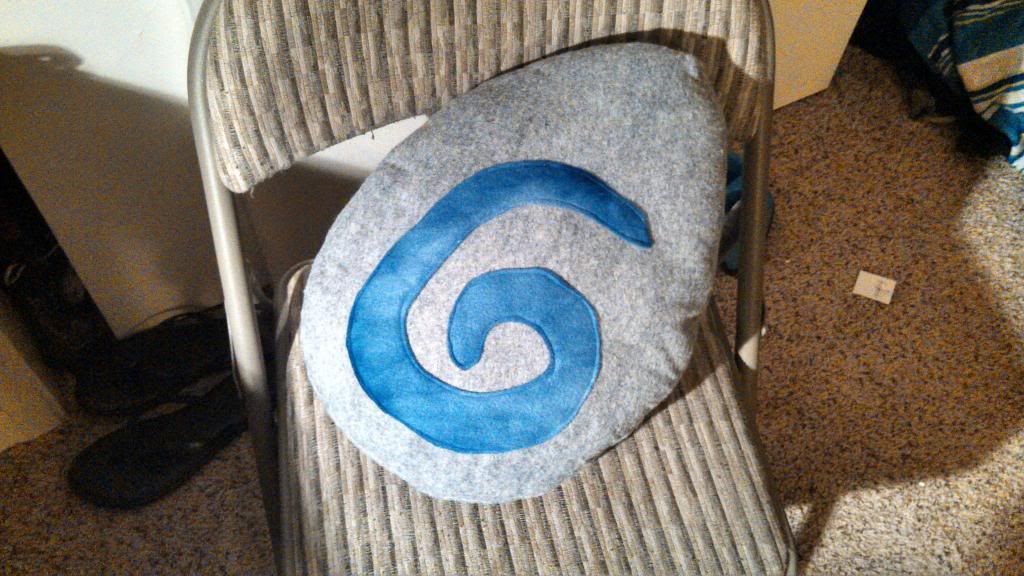
I used binder paper to make a quick template of the spiral and pillow shape (which, given the pen I used, turned out to be a very messy endeavor). I used the same patchwork-style for applying the spiral to the outside of the stone as I did in my Companion Cube pillow.
The pillow is made out of a soft woolen fabric and the spiral is polar fleece. I liked it because it was smoky with the two shades of blue.
You can't see in my photos, but the pillow is actually about 1.5-2 inches thick. I cut a rectangle strip of fabric and ran it around the whole edge to give the pillow some depth as opposed to just being a front and back stuck together. If I can get my hands on a photo that shows that off, I'll add it up here later.
I made the swirl design go opposite directions on each side so that if the grey were transparent, you wouldn't see a conflicting design in the blue. When you flip the pillow over, the design curls the other way.
Whole project took about two hours. It was a very quick way to kill time, but I still like it.
Friday, August 23, 2013
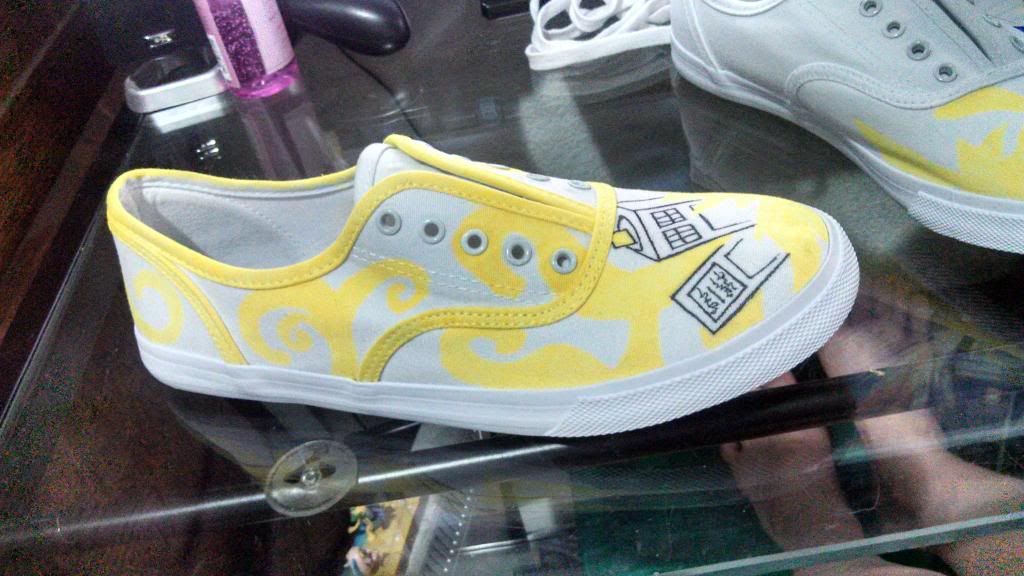
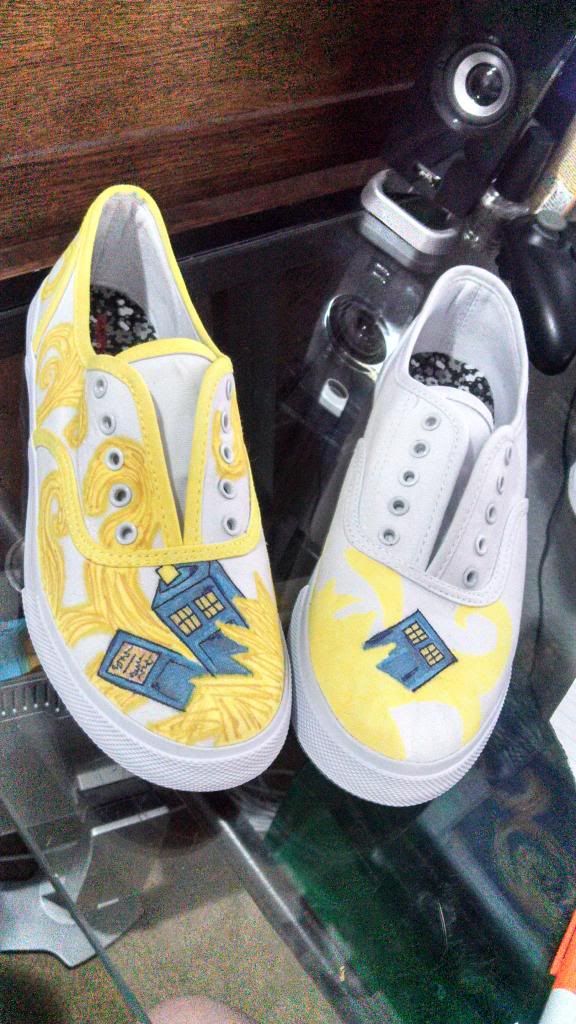
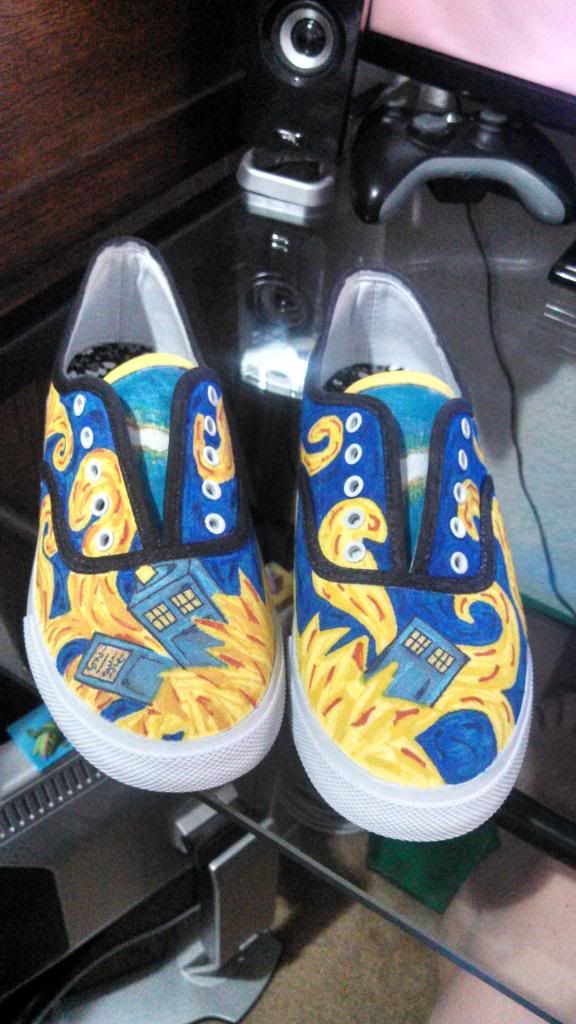
Doctor Who Tardis Explosion Shoes
I know it's been done before (time and time again; no pun intended) and I know I don't have the airbrushing or painting skills required to do true justice to the medium, but I was feeling like coloring on some shoes in the midst of reliving a Doctor Who marathon. This was just a little two-day project I decided to test out.

I bought some plain white canvas shoes at Target (I went cheap because this was my first attempt at this kind of project and didn't know how it would go) to use and did some sketching on a sheet of paper to get a feel for the size of my Tardis. I used a pencil to sketch the Tardis on the shoe and then used my yellow pen to start adding the base of the explosion. I knew I had to use the yellow first (else it would bleed with other colors and ruin my pen) and add layers of color as I went. It was weird because I'd never really colored like that before. Definitely a learning curve involved in this process for me.
Once I had the toes colored with yellow explosion, I outlined the Tardis.
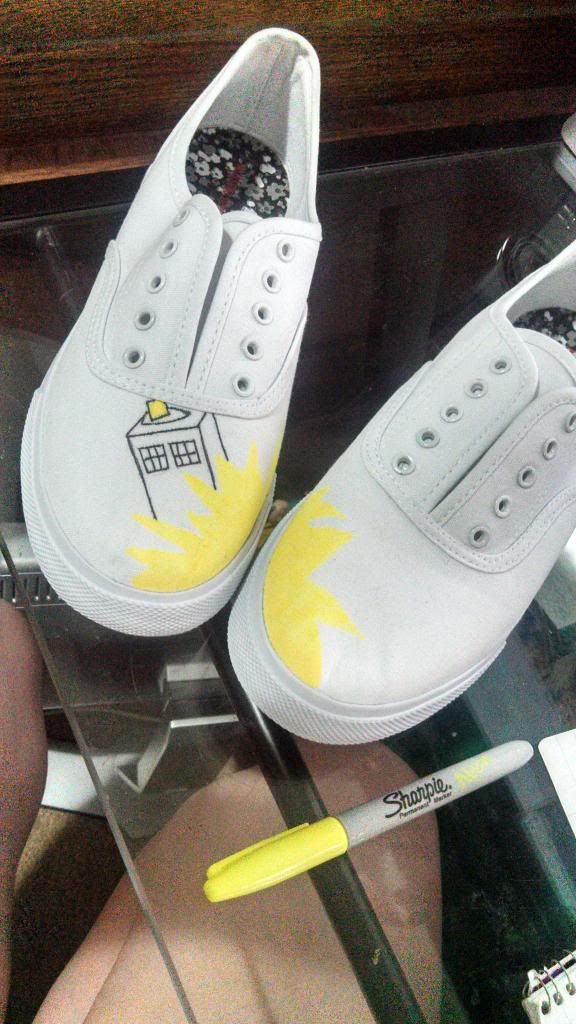

The outline was probably optional, but I was having a hard time imagining the end result and I really wanted to see it in there, so I decided to just go ahead and do it. From there, I freehanded the swirls and just had fun with making loopy designs all around the shoes.


I bought some plain white canvas shoes at Target (I went cheap because this was my first attempt at this kind of project and didn't know how it would go) to use and did some sketching on a sheet of paper to get a feel for the size of my Tardis. I used a pencil to sketch the Tardis on the shoe and then used my yellow pen to start adding the base of the explosion. I knew I had to use the yellow first (else it would bleed with other colors and ruin my pen) and add layers of color as I went. It was weird because I'd never really colored like that before. Definitely a learning curve involved in this process for me.
Once I had the toes colored with yellow explosion, I outlined the Tardis.
The outline was probably optional, but I was having a hard time imagining the end result and I really wanted to see it in there, so I decided to just go ahead and do it. From there, I freehanded the swirls and just had fun with making loopy designs all around the shoes.
I had originally made the trim on the shoes yellow in hopes of it breaking up the darkness (and adding to the BLAM EXPLOSION effect) using the natural design effect in the style of the shoe. You'll notice in the final image up top that the trim is black. My coloring hand got a bit unstable a few times and I hit the trim with my blue pen in a terribly obvious place. =( Thus, black trim in the final result.
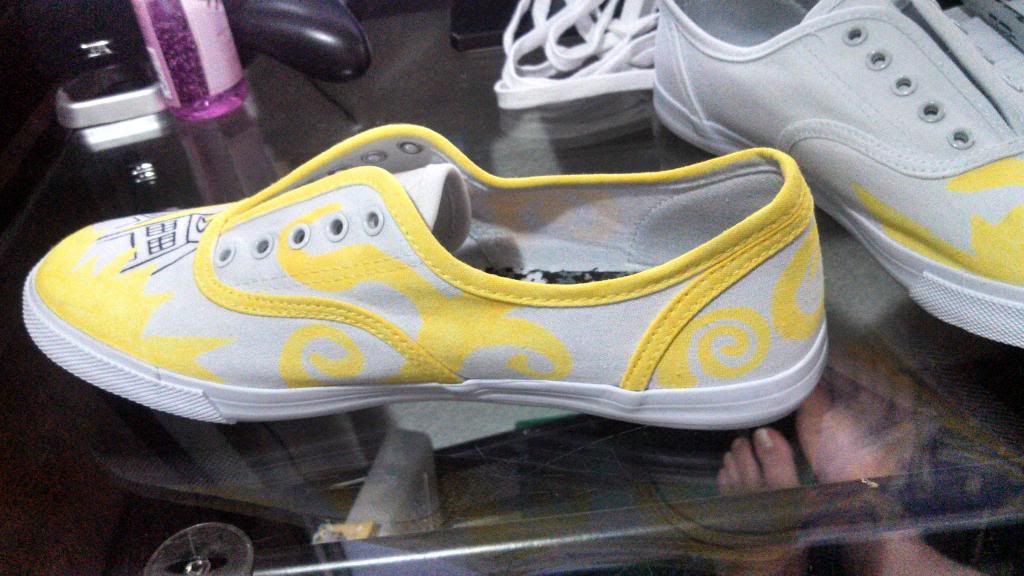
After I had my swirl base, I used another shade of yellow to outline and then add depth.
Then, because I got a little anticipatory for results (as with the Tardis outline), I colored in the toe of the shoe to get a feel for the way the explosion colors would stand out against the background.
You can see the layers being added in at this point. Oranges, yellows, all the various bright colors I had. It was all random and freehand from this point on. I tried to keep the design sporadic and unpredictable. Once I had all the explosion layers added in, I filled in the blue of the background and the designs on the heel and tongues (which I forgot to photograph in-progress). Once the blue was all in, I used dark purple, a little black, and some neon blue highlight over thinly colored patches to add depth to the backdrop. Overall, I had fun and I'm pretty proud of them. I don't care if they're not the best rendition of the Exploding Tardis, they're mine and I love them.
Saturday, July 14, 2012
Banquet Table Centerpiece
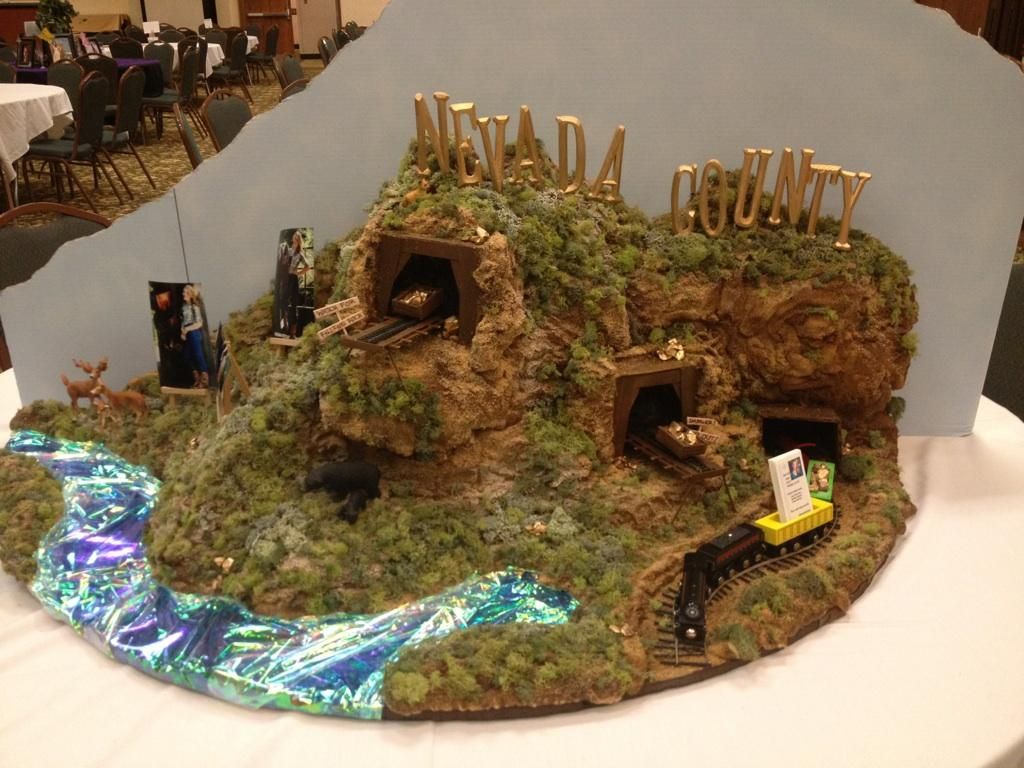
Without going into the specifics of the Miss America Organization and all that it entails, my younger cousin competed at the state level for the Miss California's Outstanding Teen program. As part of her week long stay at the venue in Fresno, she was allotted half the space of a banquet table to decorate in some manner reflective of her hometown. The quaint little town of Grass Valley nestled in the foothills about an hour north of Sacramento happens to be where I also grew up, so I was pretty excited about the chance to craft a visual homage to the place where I spent most of my life.
For reference, the table was round with a diameter of 72". The display I crafted spanned about 60" in diameter because I had to leave about a foot from the edge of the display to the table for people to sit and eat if they chose. Somewhere there is a photo of my standing next to it. I should find that ... for scale reference. Hmmm.
NOTE: I apologize in advance for some terrible photo quality and blurry images. Poor lighting (working at night) and a less-than stellar photographing device (see: my cell phone) coupled with long hours of working that leads to shakey-hand-syndrome sort of came around to bite me with some of the pictures.
First, I figured the dimensions of the table and started from there. Originally, I was told she would be given one third of the table so I began working on a piece with those dimensions. First, I sketched out an idea (a very poor one, at that) with ideas for mountainous levels and cutesy miner-esque character. Once the physical labor began, everything changed, but at least I knew what I wanted it to feel like.

The main reason my design changed was because finding trees in that quantity (or the parts to make them in that quantity) turned out to be nigh impossible on a budget. Instead of focusing on the trees of the foothills, I opted instead to work on the hills instead.
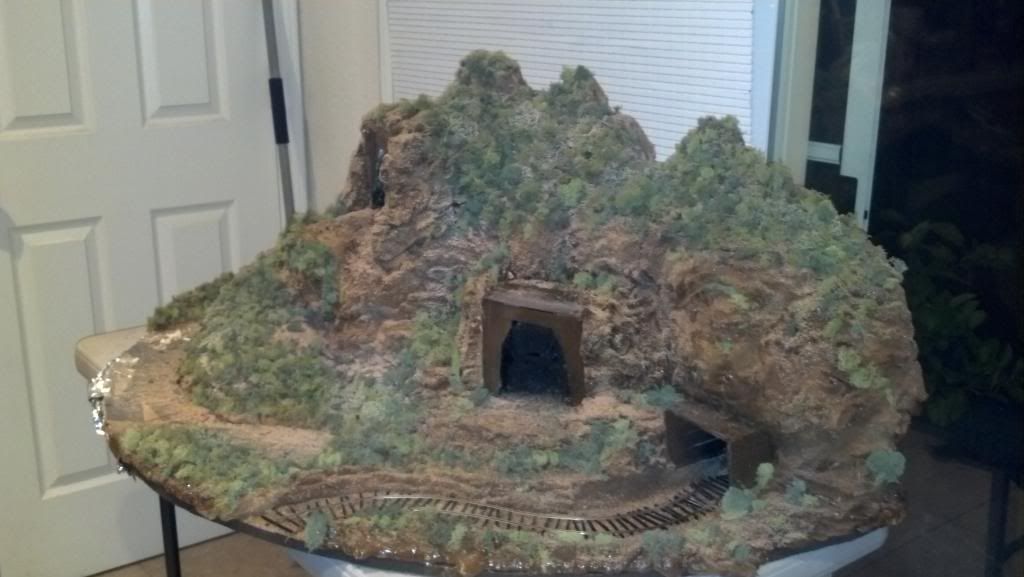
To start, I made a base with a general layout of mountains:
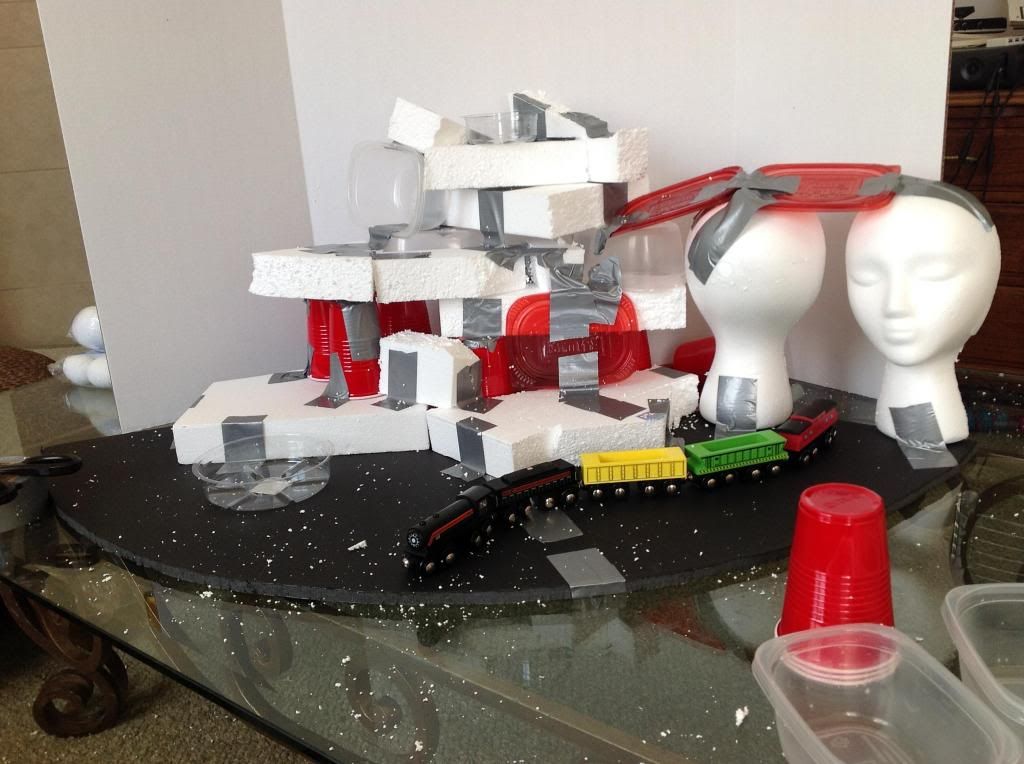
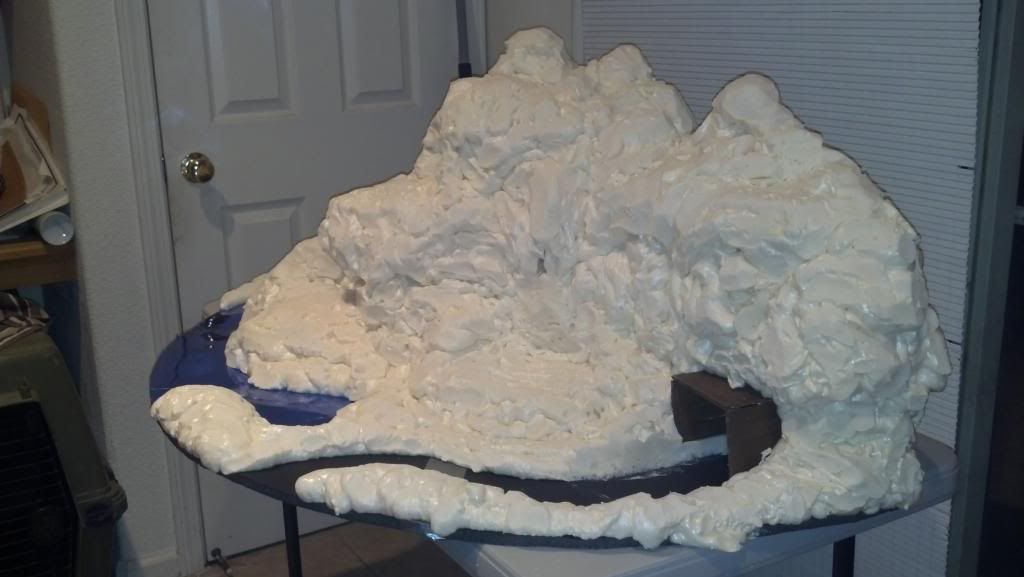
I knew I wanted the flattest parts near the edge of the display to present the river and the train ... Nevada County is very rural. I used a weird amalgam of styrofoam bits to make the skeleton ... pretty hilarious, in my opinion, when you see it laid out and taped together. It was also a very messy process, hacking all that foam. For the record, the head figure was much cheaper than buying large balls of foam, hence the weird thing I dubbed Face Mountain.
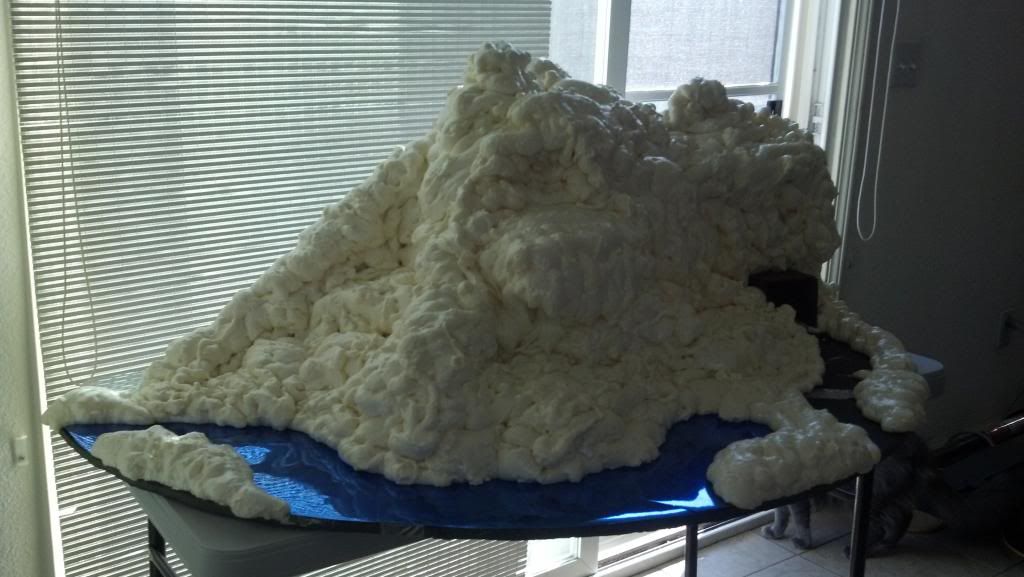
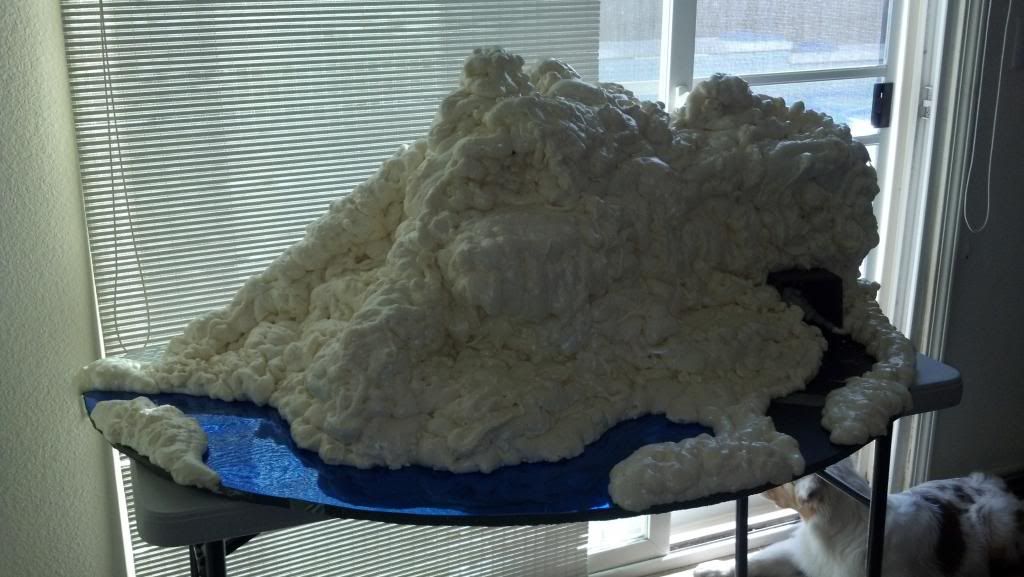
From there, I began a layer of foam. Using the expanding insulating house foam in a can, I layered from bottom to top, piece at a time. Had to pause long enough to let the layers dry (made the mistake a few times of moving on too soon ... goopy mess), then keep layering until I had a full marshmallow mountain!

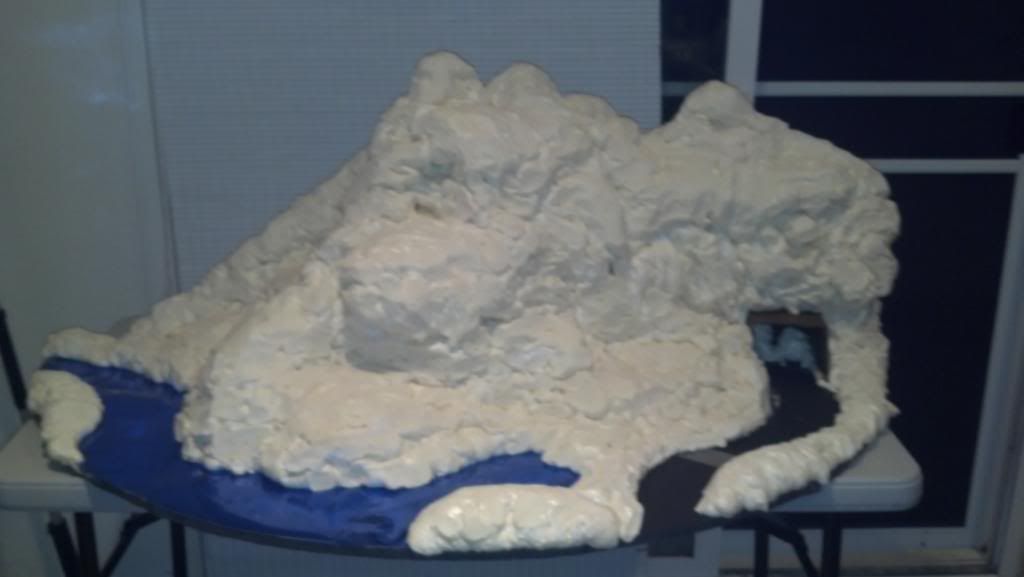
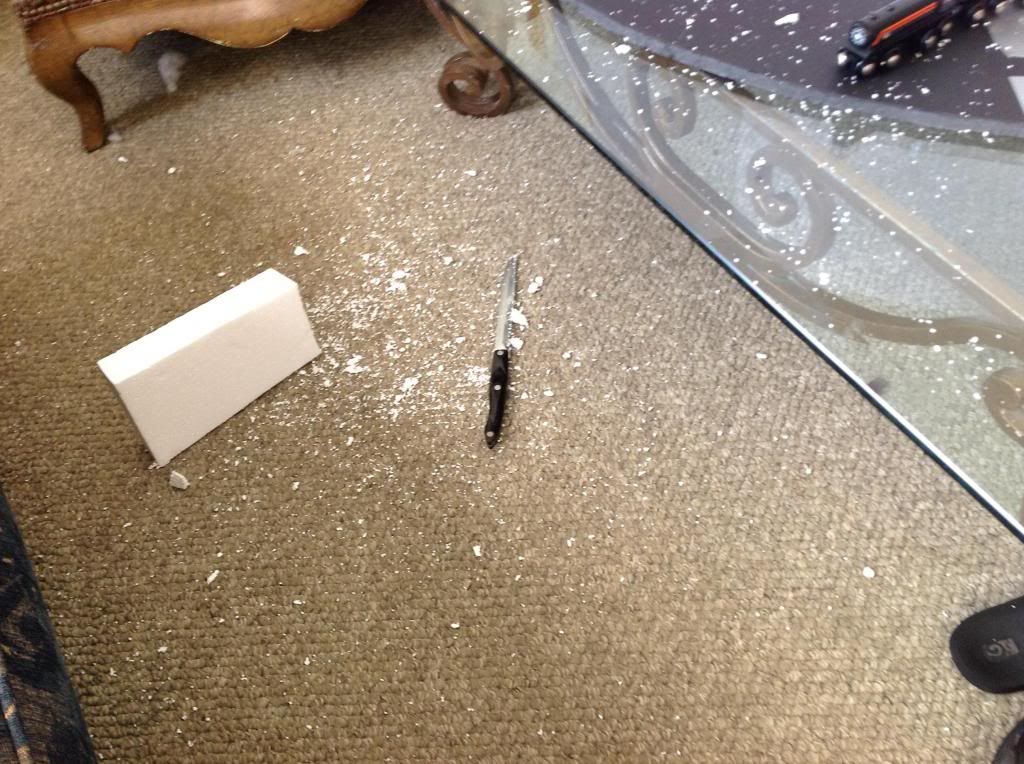
Using a standard serrated kitchen knife, I carved away and shaped the mountain into jagged and more rocky dimensions.

The following step got a bit messy ... first I added one layer of paint. Then once it dried, I used up the remainder of the paint to add sporadic darker spots here and there along the mountain form.

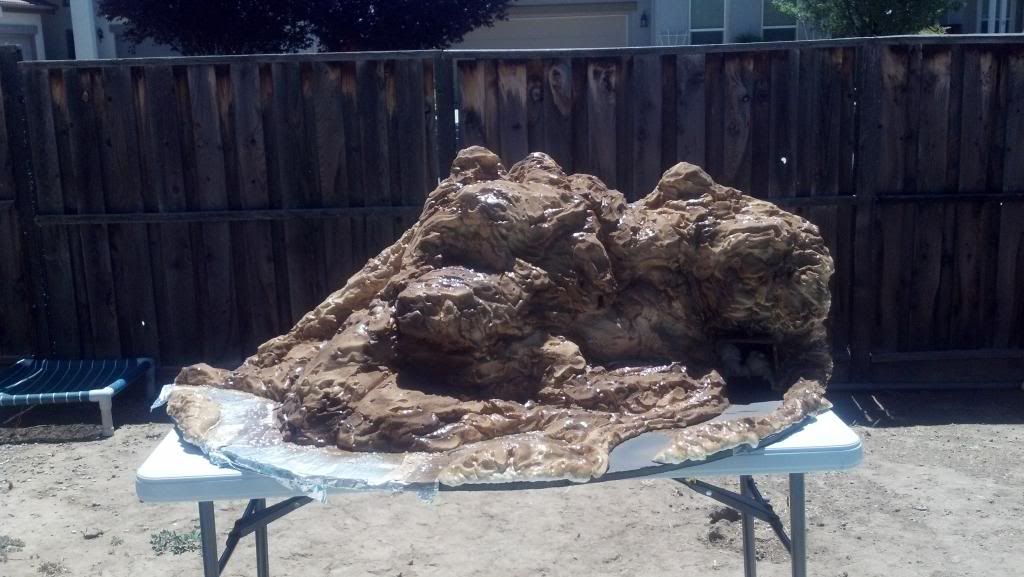

Once the paint was dried, I used spray glue in tiny patches and sprinkled sand over the top. I used two different colors of crafting sand to add depth.
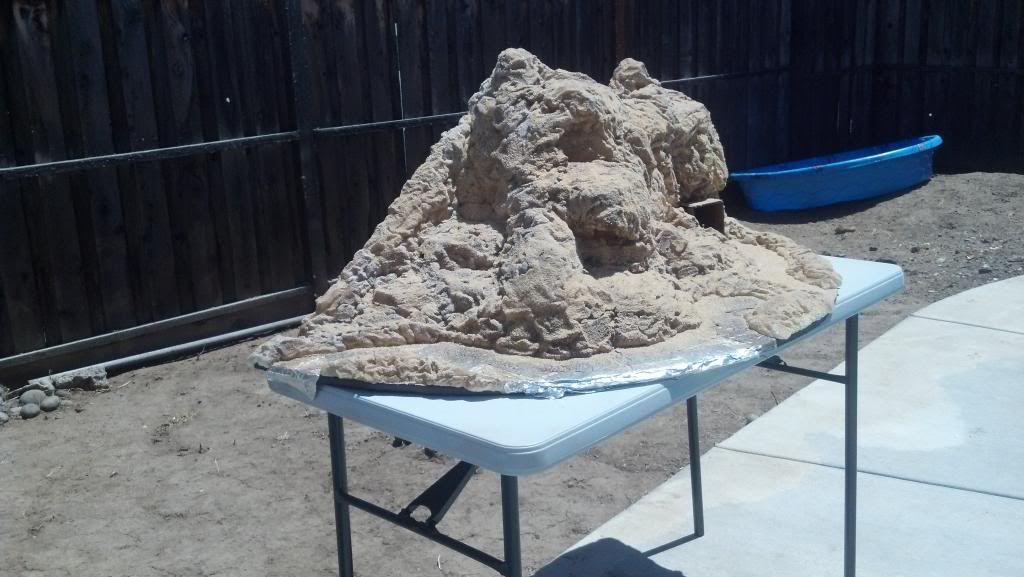

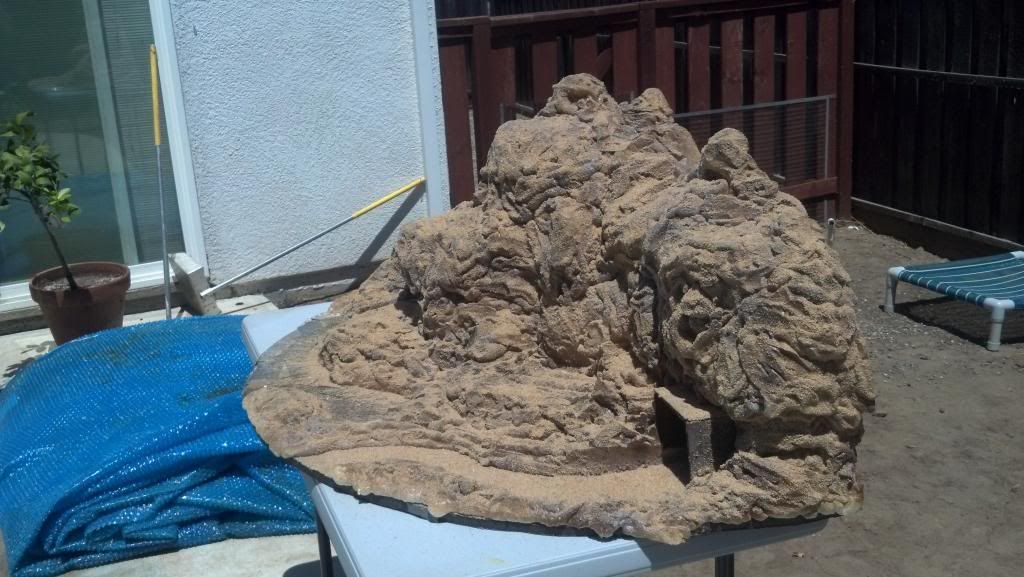
The next step involved a bit more spray glue and bags of crafting moss (two colors again) placed carefully all over.

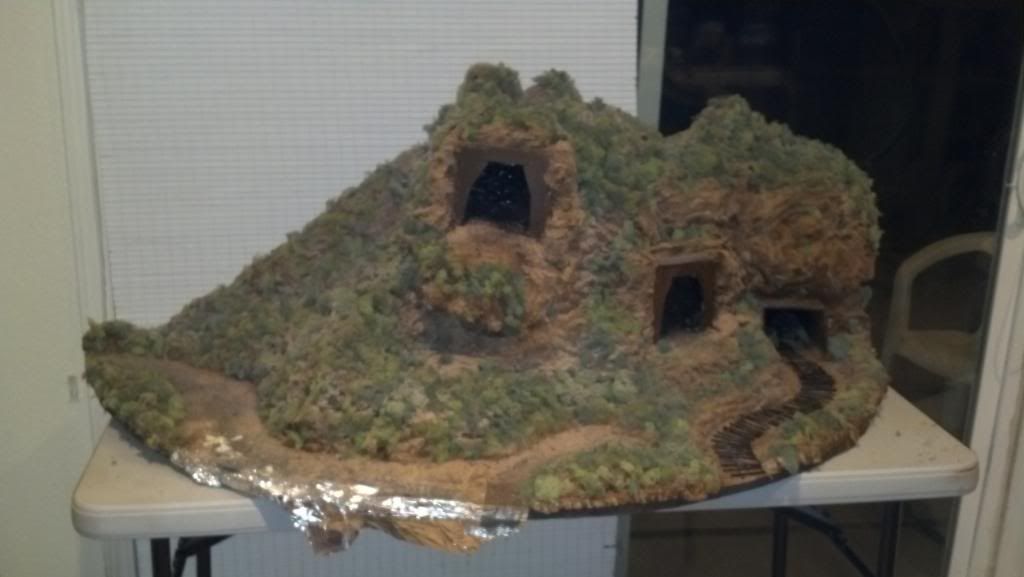
The additional pieces of the display didn't get tracked photographically (it was a long exhausting process and I forgot to take pictures of all the rest). The tracks for the mining carts were bought from a crafting hobby shop, along with the wheels and little plastic animal figurines. The carts themselves were constructed out of popsicle sticks and crafting wood, as was the raised platform for the tracks and the cavern entrances All sprayed with the same pain that was used on the mountain itself, actually. But the different texture and base color of the yielded different final results in color gradation, yet kept it all harmoniously earthy.
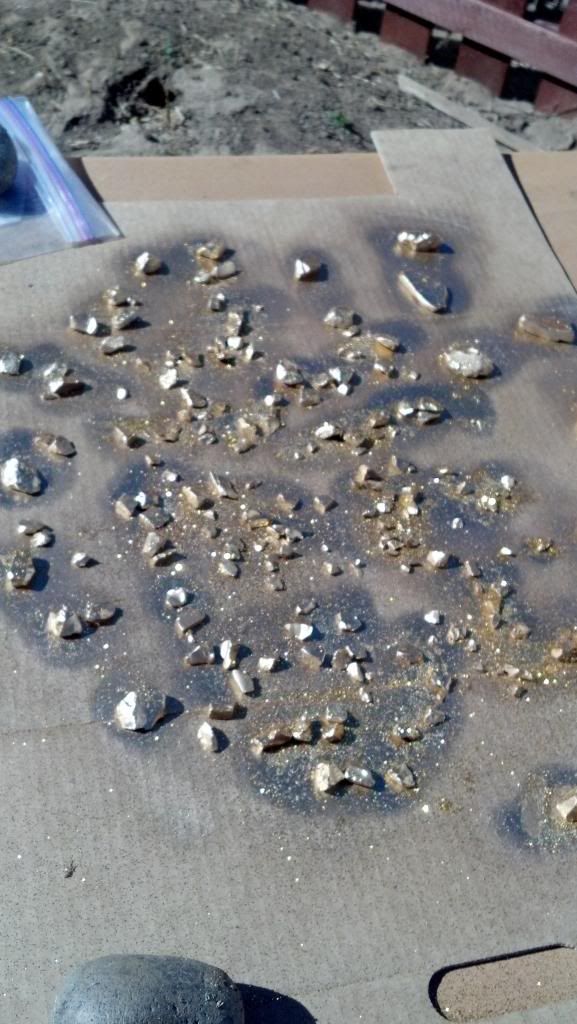
The train I bought from a store and made personalized business cards for my cousin to set up in one of the carts. All over the display itself and in both of the mining carts I placed gold nuggets. The nuggets were actually clear beach glass that I spray painted gold and sprinkled glitter over (two tones again, for depth and interest in catching the light). I like to think those tiny details add a lot to these sorts of projects.
The letters reading out "Nevada County" were bought from a craft store, painted, then glued to little dowel sticks which where then implanted in the foam. It worked out well, I think.
The river was made by putting blue paper down beneath the foam (so I had banks) and then I sprinkled bits of the gold glitter over it (there be gold in them thar waters!) and covered it with an aurora borealis style of cellophane plastic. I had lots of other ideas for the river (ranging from mosaic mirror pieces to actual craft kits for making water), but somehow this is just what I was able to pull off.

Mine cart near train detail:
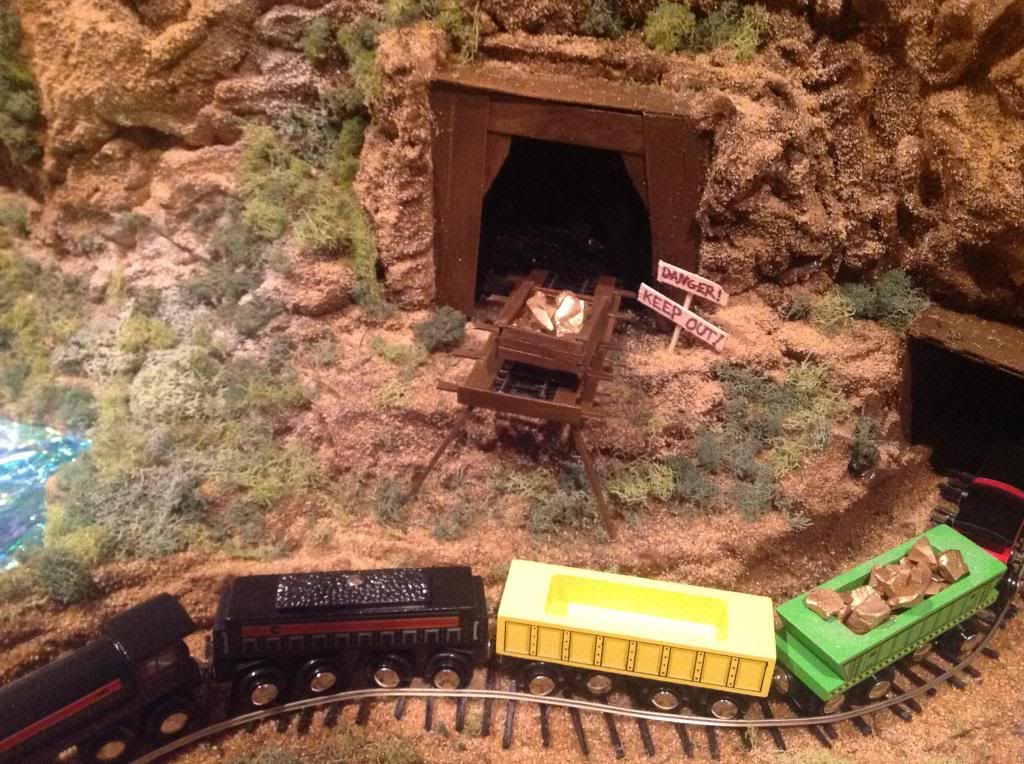
Mine cart on cliff detail:

In both of the detail shots, you can't see any additional gold hidden in the mountain because I only laid those out once we got to the venue. Since they were loosely placed, it would have been very hard to transport without having most of them fly off in a car or in a driveway somewhere. If you look closely, you can see them in the final shot once we had it on the table.
The final touch on this project were the little easels on the left side of the display. Three of them, each holding up a photograph of my little cousin dressed out in a cute little plaid top, jeans, and boots, posing with some of the old mining equipment in the county. =)
The whole project took about three or four days to complete (lots of waiting for things to dry, mostly) and I'm quite pleased with it overall. =)
For reference, the table was round with a diameter of 72". The display I crafted spanned about 60" in diameter because I had to leave about a foot from the edge of the display to the table for people to sit and eat if they chose. Somewhere there is a photo of my standing next to it. I should find that ... for scale reference. Hmmm.
NOTE: I apologize in advance for some terrible photo quality and blurry images. Poor lighting (working at night) and a less-than stellar photographing device (see: my cell phone) coupled with long hours of working that leads to shakey-hand-syndrome sort of came around to bite me with some of the pictures.
First, I figured the dimensions of the table and started from there. Originally, I was told she would be given one third of the table so I began working on a piece with those dimensions. First, I sketched out an idea (a very poor one, at that) with ideas for mountainous levels and cutesy miner-esque character. Once the physical labor began, everything changed, but at least I knew what I wanted it to feel like.
The main reason my design changed was because finding trees in that quantity (or the parts to make them in that quantity) turned out to be nigh impossible on a budget. Instead of focusing on the trees of the foothills, I opted instead to work on the hills instead.
To start, I made a base with a general layout of mountains:
I knew I wanted the flattest parts near the edge of the display to present the river and the train ... Nevada County is very rural. I used a weird amalgam of styrofoam bits to make the skeleton ... pretty hilarious, in my opinion, when you see it laid out and taped together. It was also a very messy process, hacking all that foam. For the record, the head figure was much cheaper than buying large balls of foam, hence the weird thing I dubbed Face Mountain.
From there, I began a layer of foam. Using the expanding insulating house foam in a can, I layered from bottom to top, piece at a time. Had to pause long enough to let the layers dry (made the mistake a few times of moving on too soon ... goopy mess), then keep layering until I had a full marshmallow mountain!
Using a standard serrated kitchen knife, I carved away and shaped the mountain into jagged and more rocky dimensions.
The following step got a bit messy ... first I added one layer of paint. Then once it dried, I used up the remainder of the paint to add sporadic darker spots here and there along the mountain form.
Once the paint was dried, I used spray glue in tiny patches and sprinkled sand over the top. I used two different colors of crafting sand to add depth.
The next step involved a bit more spray glue and bags of crafting moss (two colors again) placed carefully all over.
The additional pieces of the display didn't get tracked photographically (it was a long exhausting process and I forgot to take pictures of all the rest). The tracks for the mining carts were bought from a crafting hobby shop, along with the wheels and little plastic animal figurines. The carts themselves were constructed out of popsicle sticks and crafting wood, as was the raised platform for the tracks and the cavern entrances All sprayed with the same pain that was used on the mountain itself, actually. But the different texture and base color of the yielded different final results in color gradation, yet kept it all harmoniously earthy.
The train I bought from a store and made personalized business cards for my cousin to set up in one of the carts. All over the display itself and in both of the mining carts I placed gold nuggets. The nuggets were actually clear beach glass that I spray painted gold and sprinkled glitter over (two tones again, for depth and interest in catching the light). I like to think those tiny details add a lot to these sorts of projects.
The letters reading out "Nevada County" were bought from a craft store, painted, then glued to little dowel sticks which where then implanted in the foam. It worked out well, I think.
The river was made by putting blue paper down beneath the foam (so I had banks) and then I sprinkled bits of the gold glitter over it (there be gold in them thar waters!) and covered it with an aurora borealis style of cellophane plastic. I had lots of other ideas for the river (ranging from mosaic mirror pieces to actual craft kits for making water), but somehow this is just what I was able to pull off.
Mine cart near train detail:
Mine cart on cliff detail:
In both of the detail shots, you can't see any additional gold hidden in the mountain because I only laid those out once we got to the venue. Since they were loosely placed, it would have been very hard to transport without having most of them fly off in a car or in a driveway somewhere. If you look closely, you can see them in the final shot once we had it on the table.
The final touch on this project were the little easels on the left side of the display. Three of them, each holding up a photograph of my little cousin dressed out in a cute little plaid top, jeans, and boots, posing with some of the old mining equipment in the county. =)
The whole project took about three or four days to complete (lots of waiting for things to dry, mostly) and I'm quite pleased with it overall. =)
Tuesday, June 21, 2011
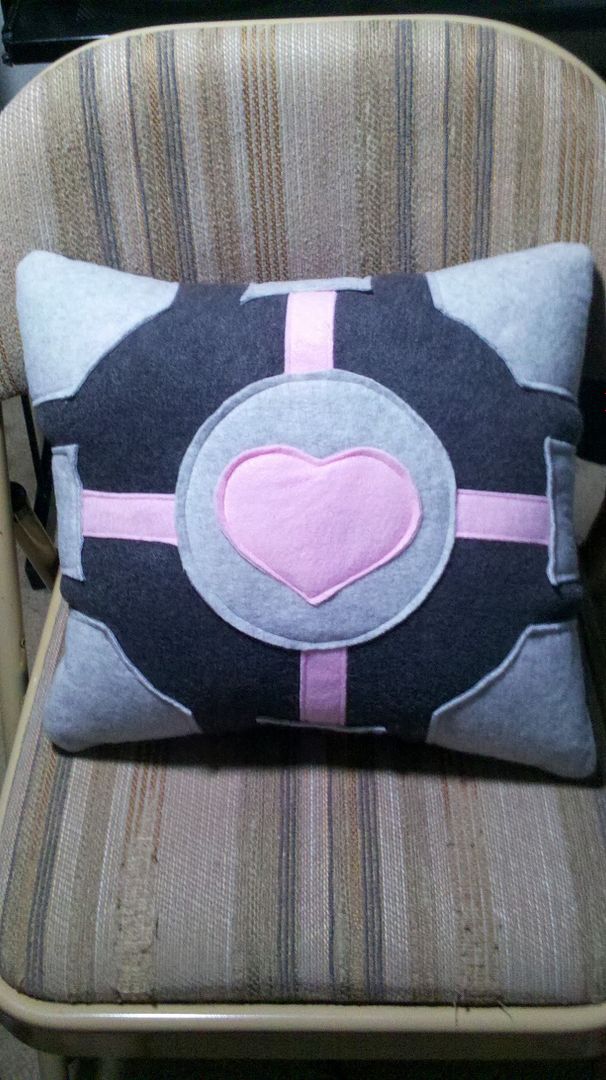
Companion Pillow

Gave myself a little day project about a week ago. Was on a kick after finally being able to play Portal 2 (had to wait until I was out of school, or else I never would have gotten any work done!). I'd been eyeing ThinkGeek's Companion Cube plushie since forever ago (i.e. it's appearance on the site), but being the poor college student that I am, I'm unwilling to hand over the money at this point in time. Also, there's something way more satisfying about having a snuggly companion sprung from my own hands.
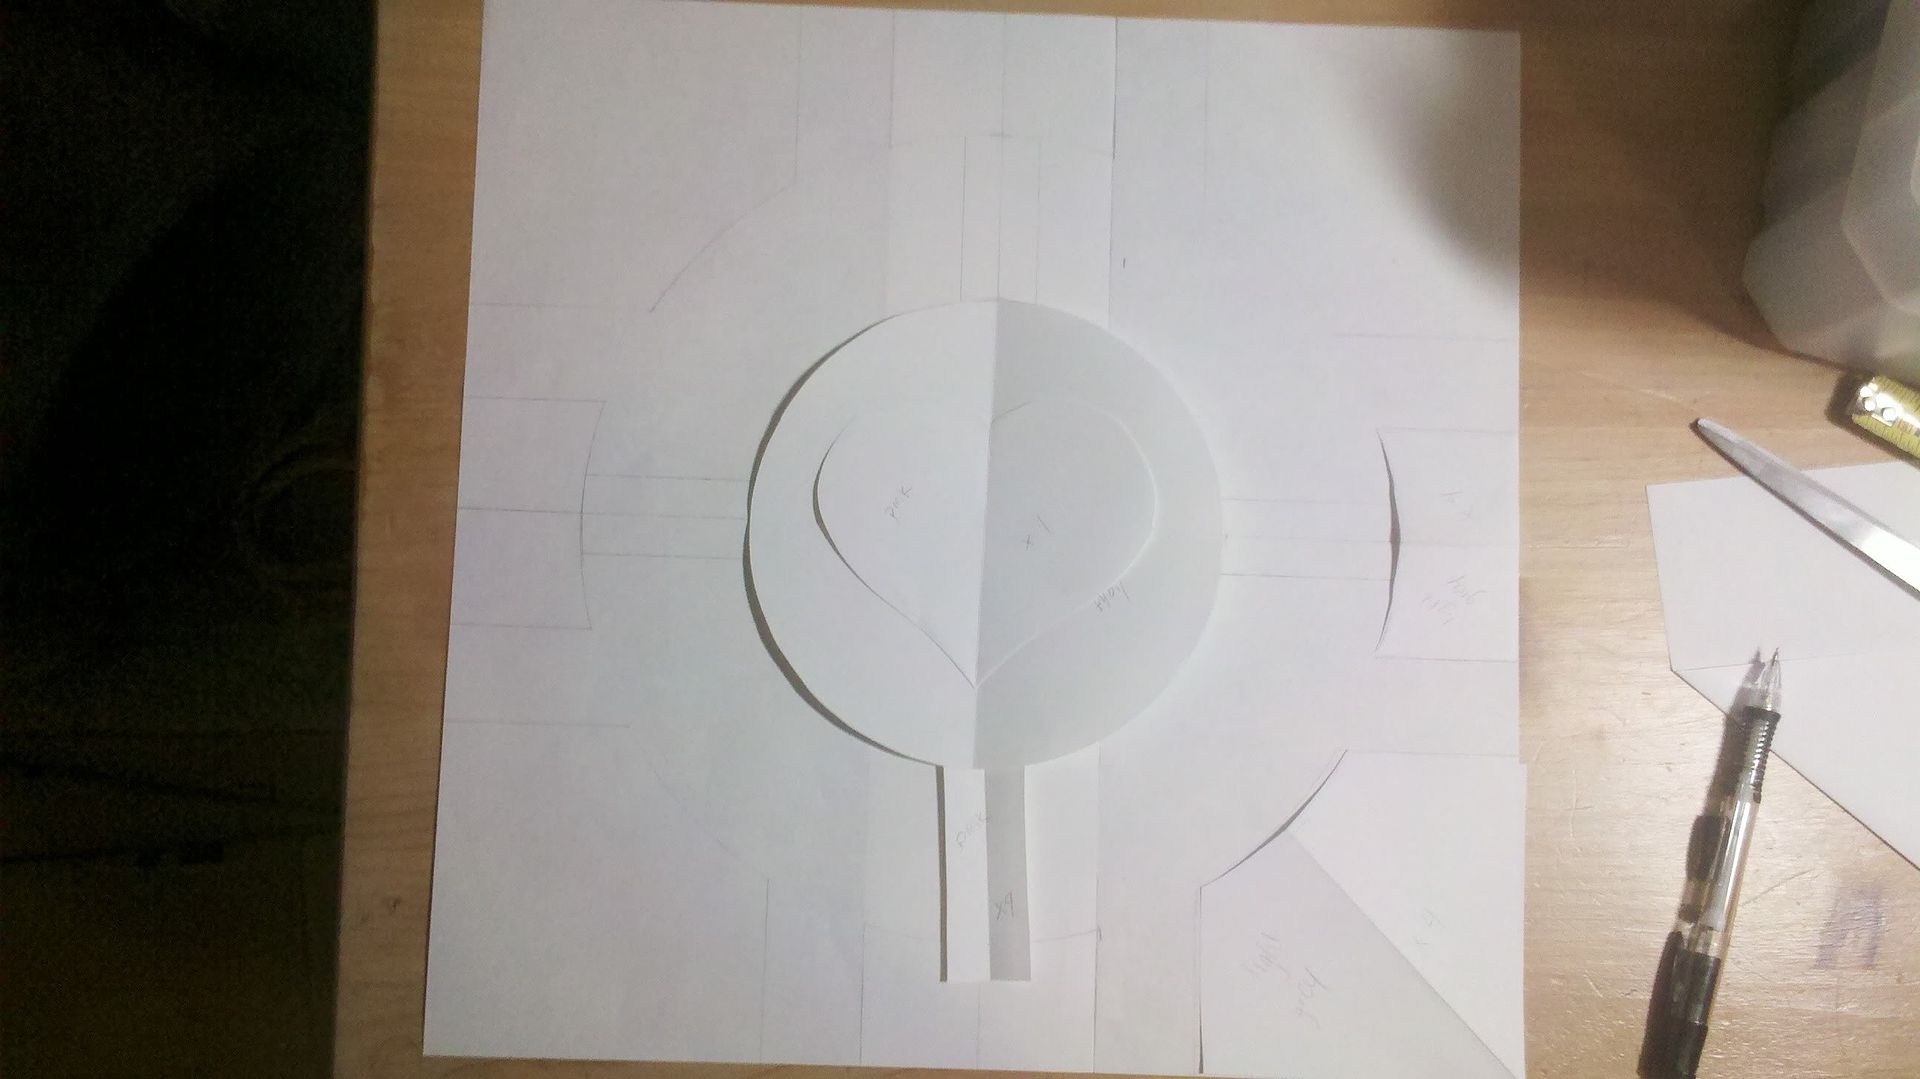
Using two sheets of legal printer paper, I created a 14x14 square base pattern to be the starting point for my project. Using two different sized plates in order to get perfect circles, I traced out the shapes on the paper and gave myself a lovely two-dimensional face of the cube. Then I traced out over and made little pattern pieces for each of the patch parts. Lots of math to get everything placed equally around the center, but nothing too hard. My English degree-in-progress is thankful.
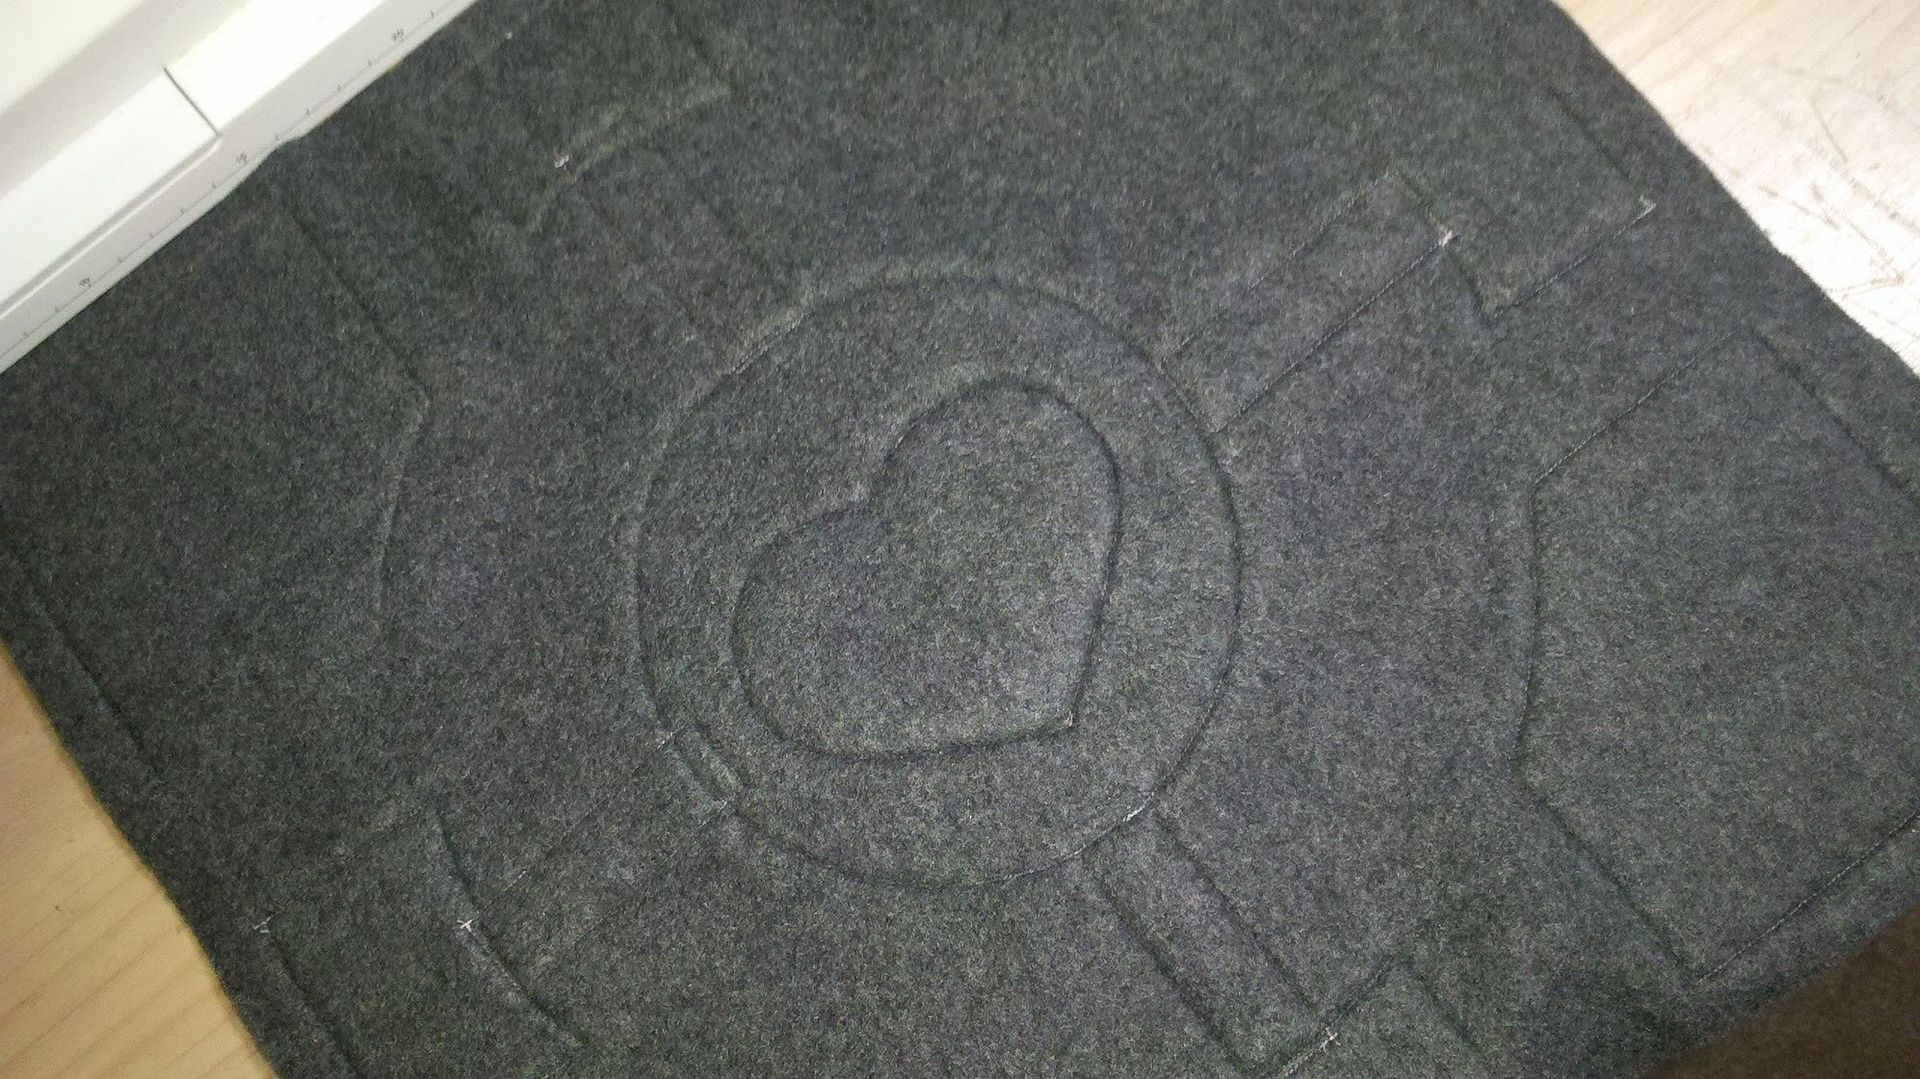
The next day, I went to the store and picked up all the required materials from the local fabric store: fleece in a dark and light grey and in a baby pastel pink, light grey and pink thread, and some double-sided heat bond. I used the dark grey fleece to make two 14x14 squares, then used the other pattern pieces to cut out the patches to make the design work. The patches were ironed to the adhesive bond first, just to help the material hold it shape once I started sewing everything together. Starting with the pink, I stitched the heart to the center circle, then the lines to the dark grey base. One piece layered on top of the next until I had a little patchwork representation of the cube's face.

Place the two grey sheets face to face, design on the inside, sew all the way around, leaving a gap on the bottom to turn it inside out (just a little bit bigger than the center light grey patch). Turn right-side out, cram full of squishy, bouncy polyester fiber fill, hand stitch the gap closed, and viola! My new snuggle pillow. =3
Sunday, November 14, 2010
Halloween Crashing!
Having completed this year's costume, with a brief reference to my endeavors the year before, I now have the time to do a quick summary post on what exactly last year's project was. I'm excited to share this and make this blog look a little less lonely.
I had a pair of friends from work and we decided we all wanted to dress up together. I'd recently introduced said friends to Castle Crashers and they were sort of on a high the way a little kid wants to play with a new toy all the time. "Let's be that!"
There were only three of us total, so we enlisted a fourth -- a new hire at work and new partner in crime to our little social group. There were many ideas on what we would do for the costume itself. We knew we couldn't wear masks at work; anything that obscures the face is not allowed. I did lots of sketches that involved a cutaway headpiece that we could finish up with makeup. If anyone is interested in seeing those, please speak up and I'll see if I can find them ... they got scrapped quickly due to lack of interest and the limit of comfort they'd have to wear all day. At best, I can explain it in further depth if someone wants to know about them.
Once I trashed the idea of a helmet, I decided that we should make the Castle Crashers our own. We were women and we'd rock those Crashers with our own special sexy appeal -- while remaining 100% clothed and not exposing skin (I'm so against the 'I'm sexy because it's a miniskirt and a crop top' costume; that's trashy .. I prefer classy!). I started some pencil sketches to try and figure out what we could do. After a few drafts, I finally came to a collection of designs I loaded up on the computer and colored quickly.
(I am not an artist, drawing/coloring is not my thing, I do it just to get visual ideas of what I plan to create; please be kind to my silly sketches!)
I presented my drawing to my cohorts and they were extremely pleased and stoked to get started on the process.

Once we had our wigs, we could shop for fabric!
In the meantime, while we'd been waiting for the wigs to arrive, we bounced around and window shopped until we found acceptable footwear. Yes, pricey. But they're reusable and quite comfortable. Worth it, we all agreed.
We had also done some window shopping at the fabric stores to find patterns. I can't find the patterns at the moment (last year's stuff got packed away and my lethargy dictates that I not destroy the storage space in order to try and find them), but after browsing around online I do believe we used variation A of this B5554 pattern for our dresses. We altered the length for sexy purposes. For our waist cinches, we used M2337, but ditched the laces in the front in favor of eye hooks in the back.
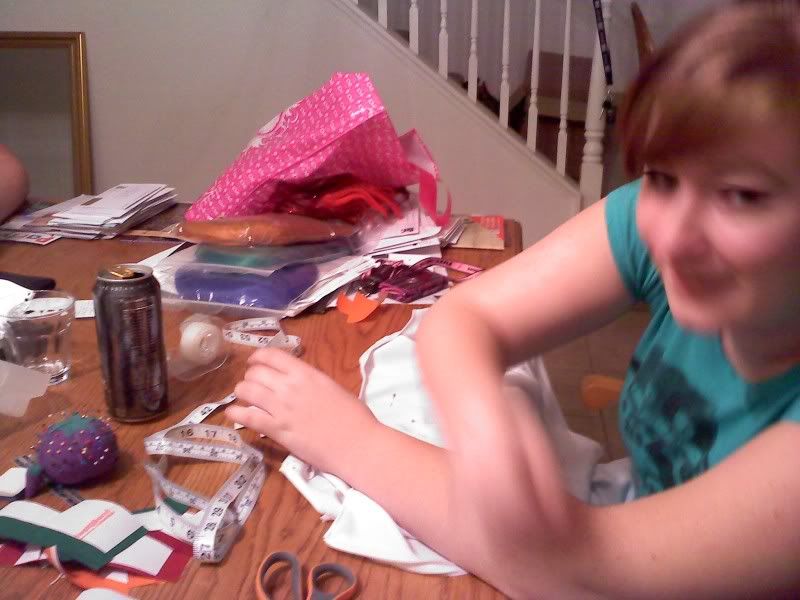
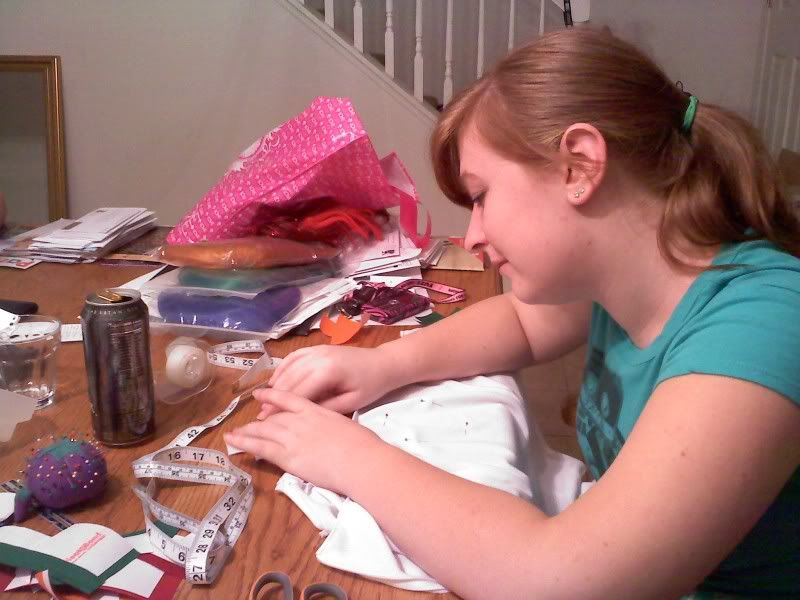
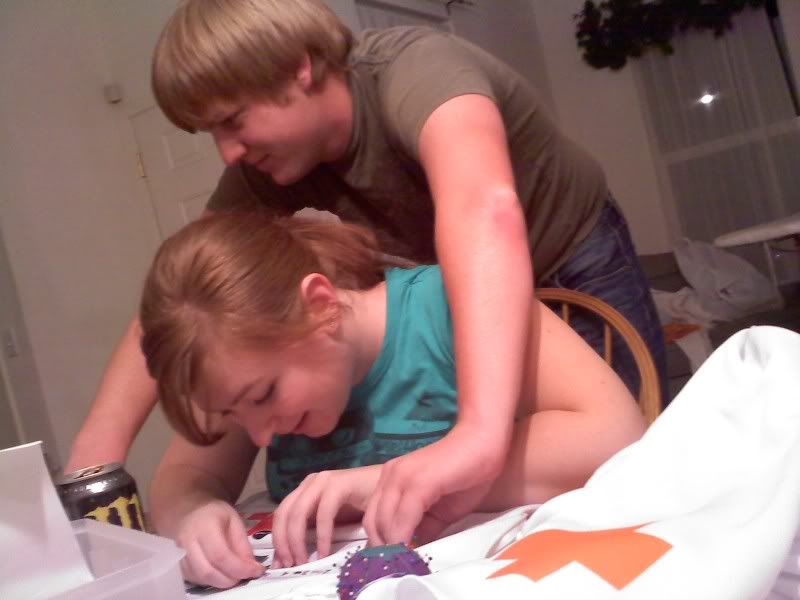
All that aside, there really isn't much to explain on these costumes. We fitted ourselves, sewed everything together, and rocked hard. But it was a very fun, social experience. I have a multitude of pictures of the in progress work, but I'll just make a handy list instead of bore you with too much rambling. They're in no particular order, just the way they got loaded in to my photobucket. Feel free to look at me and my friends being crazy, cracked out on energy drinks, and sewing like we belonged to a low-wage sweat shop. It was a good time, really.
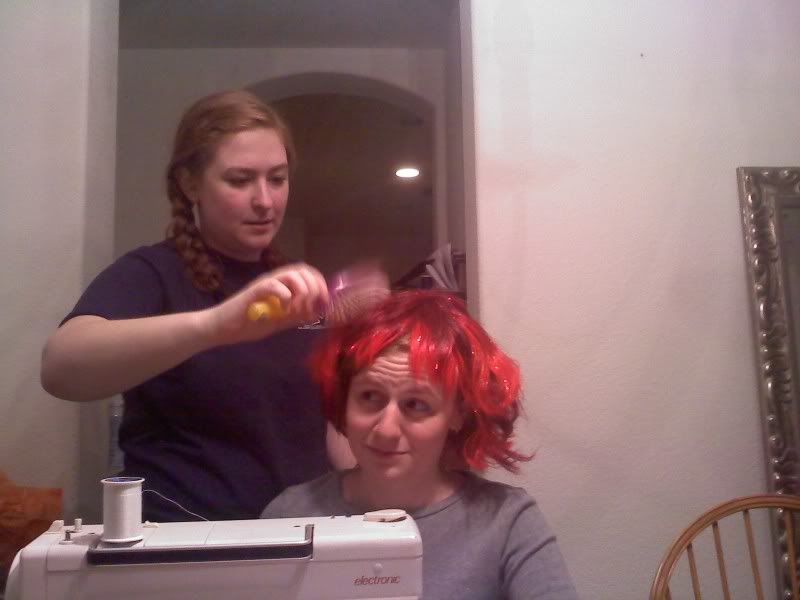
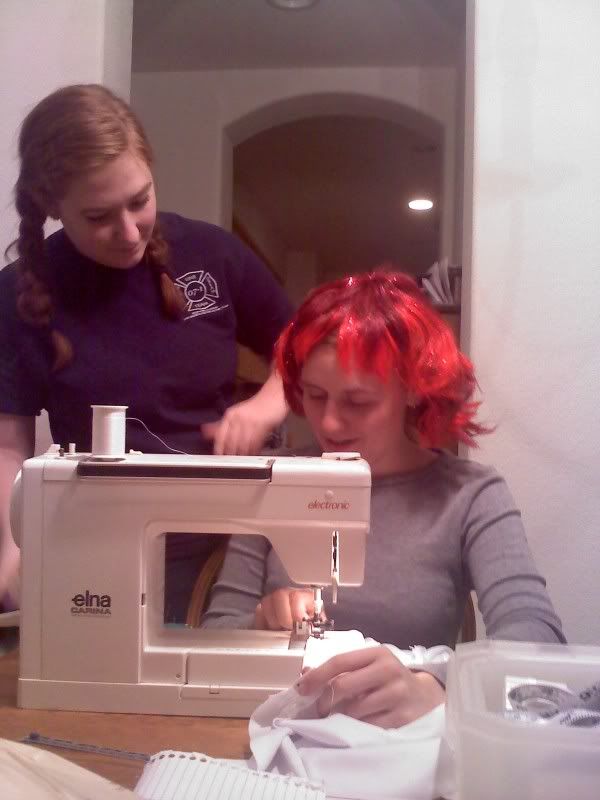
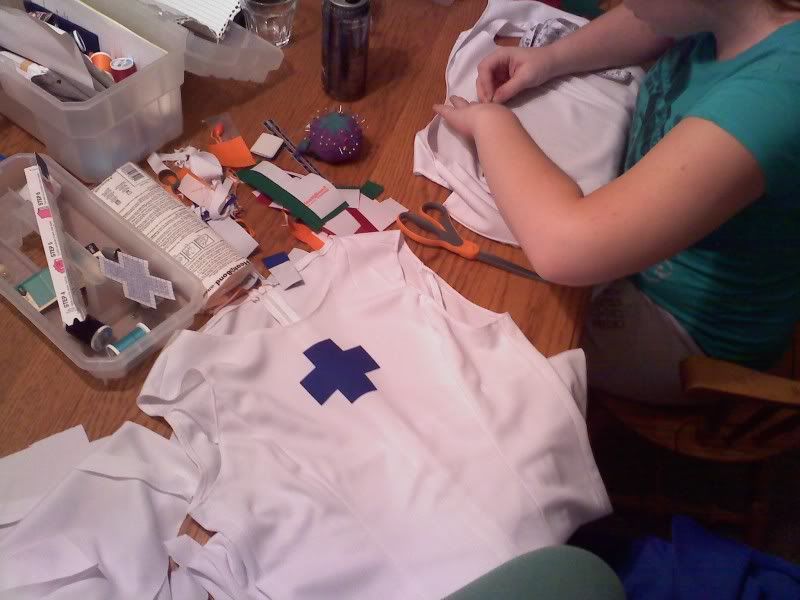
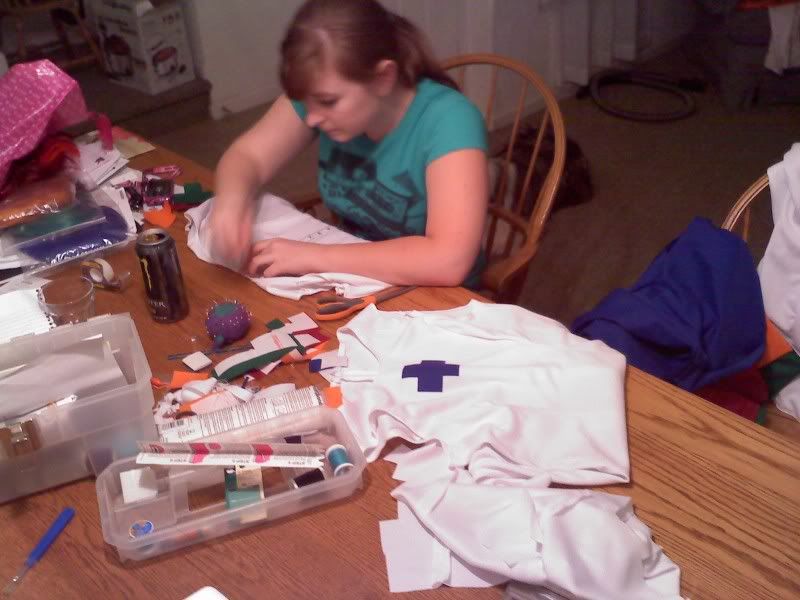
Trying to style that horrid red wig was miserable. I was trying to sew, Megan did what she could for that terrible mop:.
The process for applying our crosses was also left to Megan and her beautiful OCD compulsions. Sometimes she had to enlist help though, for an extra set of hands. They were applied with iron on transfer material.

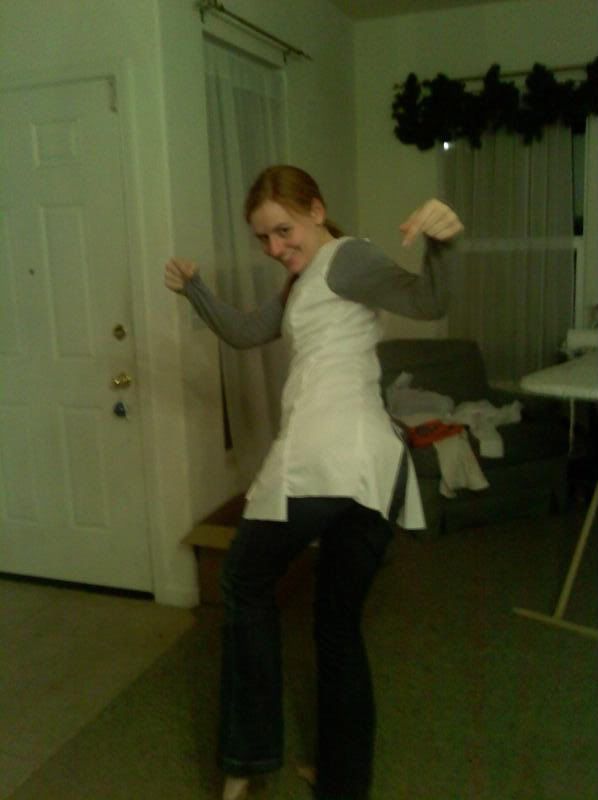
When the first dress was somewhat assembled, I took it for a test run. I was excited. We hadn't finished the seam up the back below the zipper just yet.

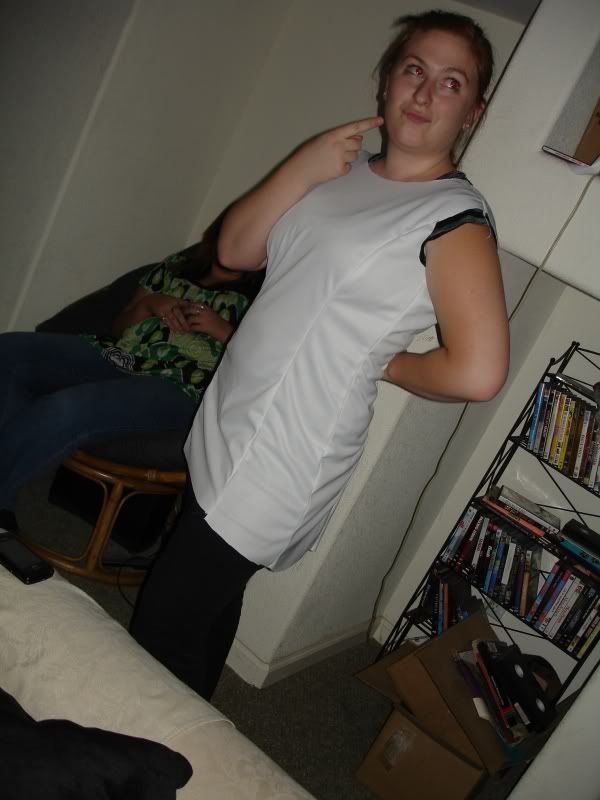
When we got another partway assembled (sans zipper), Megan took hers for a spin.
We bought ourselves grey turtlenecks and black leggings to go under the dresses. Also black opera-length gloves to substitute as our war gauntlets, but femininely! Completely covered, no bare skin, but it all ended up super sexy, I think. In case you can't tell, I was very, very excited with the way things were going.

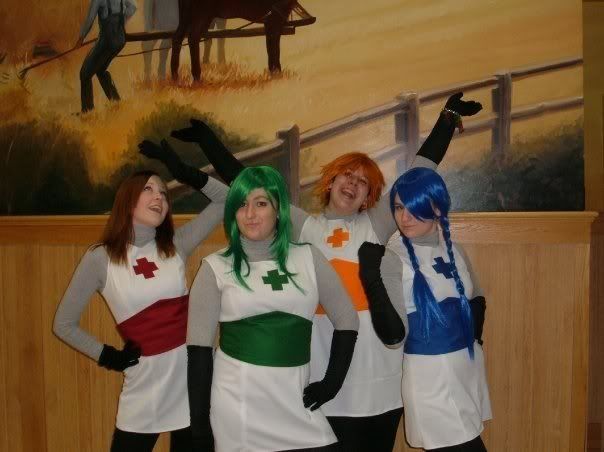
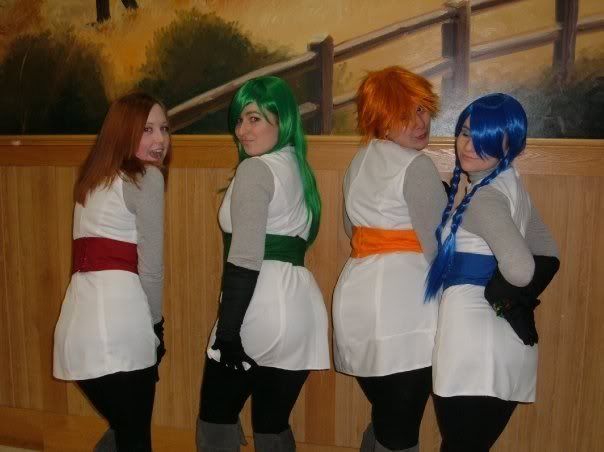
And finally; ta da!
My original drawing had to be recreated once we had it all together. My wig ended up in braids because that thing was just way too much hair to handle while at work. I'd planned on us all having lipstick to match our hair as well, but someone decided she wasn't going to play along with the rest of us. It ended up getting scrapped like, the night before. Oh well. Some people just don't like dressup as much as I do, I guess.
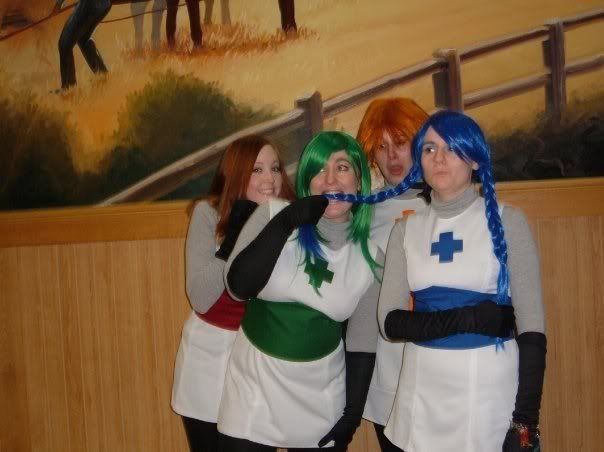
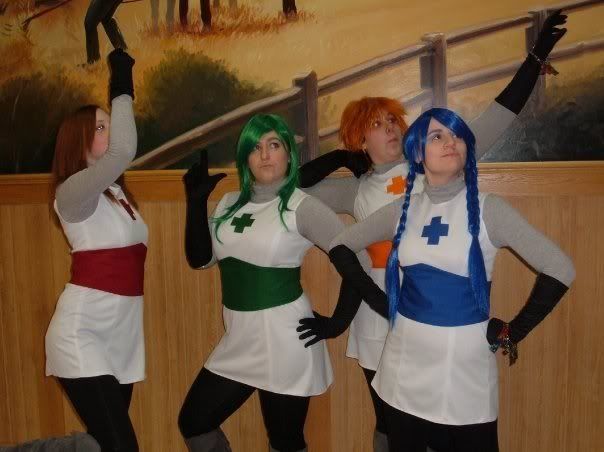
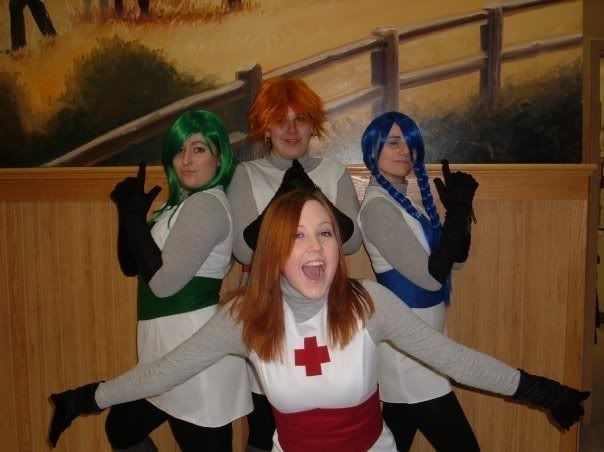
Other finished shots of us at work:

You may notice that some of us (namely myself) have bracelets on with bangles. We used Shrinky Dinks to create little charms for ourselves. Each one of us had all four of the main Crashers as seen in their default and well known image. In between each one we each had our own collection of other charms. Mine included some of the little pets you can obtain. Some of the other girls wanted princesses on theirs, or the king himself. We each made our own so they were all a little different, but then we could show people who we were dressed up (sort of) as when they asked. I'll see if I can't get a picture of mine taken so you can see the detail; it's hanging in my car still. I'm quite proud of it.
I had a pair of friends from work and we decided we all wanted to dress up together. I'd recently introduced said friends to Castle Crashers and they were sort of on a high the way a little kid wants to play with a new toy all the time. "Let's be that!"
There were only three of us total, so we enlisted a fourth -- a new hire at work and new partner in crime to our little social group. There were many ideas on what we would do for the costume itself. We knew we couldn't wear masks at work; anything that obscures the face is not allowed. I did lots of sketches that involved a cutaway headpiece that we could finish up with makeup. If anyone is interested in seeing those, please speak up and I'll see if I can find them ... they got scrapped quickly due to lack of interest and the limit of comfort they'd have to wear all day. At best, I can explain it in further depth if someone wants to know about them.
Once I trashed the idea of a helmet, I decided that we should make the Castle Crashers our own. We were women and we'd rock those Crashers with our own special sexy appeal -- while remaining 100% clothed and not exposing skin (I'm so against the 'I'm sexy because it's a miniskirt and a crop top' costume; that's trashy .. I prefer classy!). I started some pencil sketches to try and figure out what we could do. After a few drafts, I finally came to a collection of designs I loaded up on the computer and colored quickly.
(I am not an artist, drawing/coloring is not my thing, I do it just to get visual ideas of what I plan to create; please be kind to my silly sketches!)
I presented my drawing to my cohorts and they were extremely pleased and stoked to get started on the process.
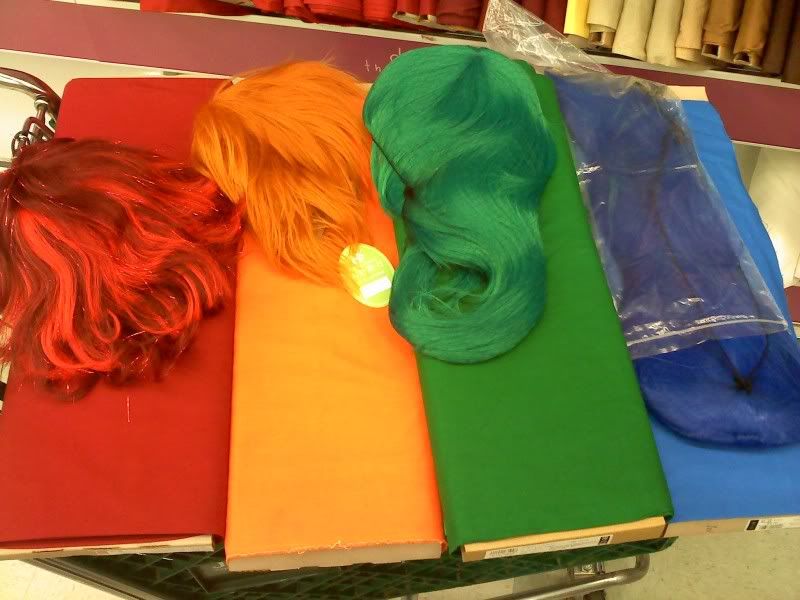
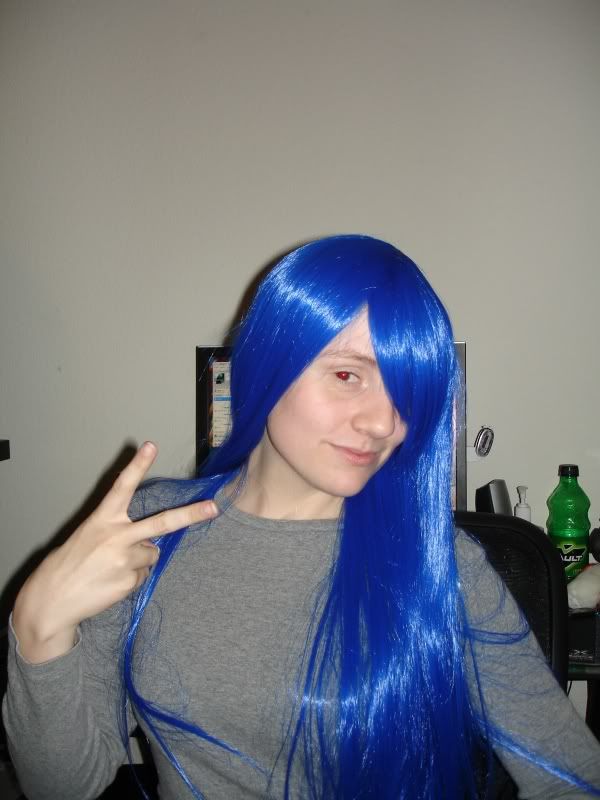
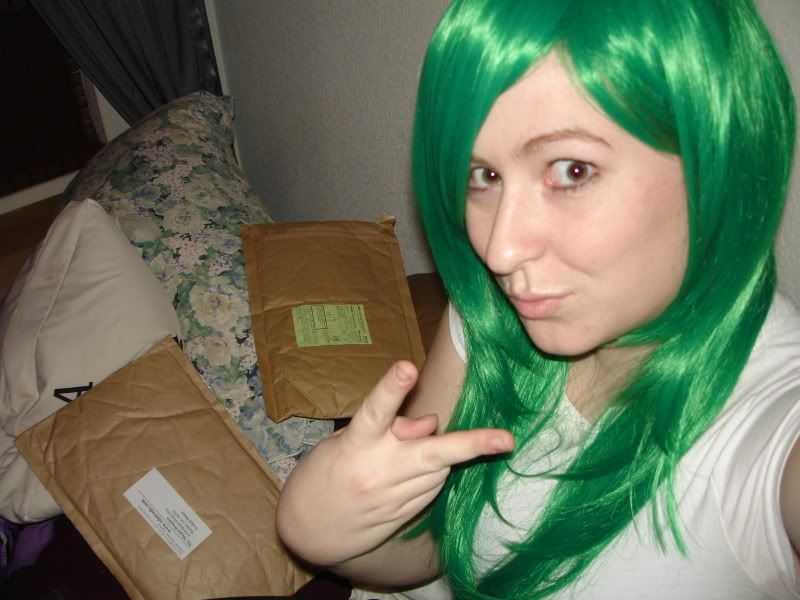
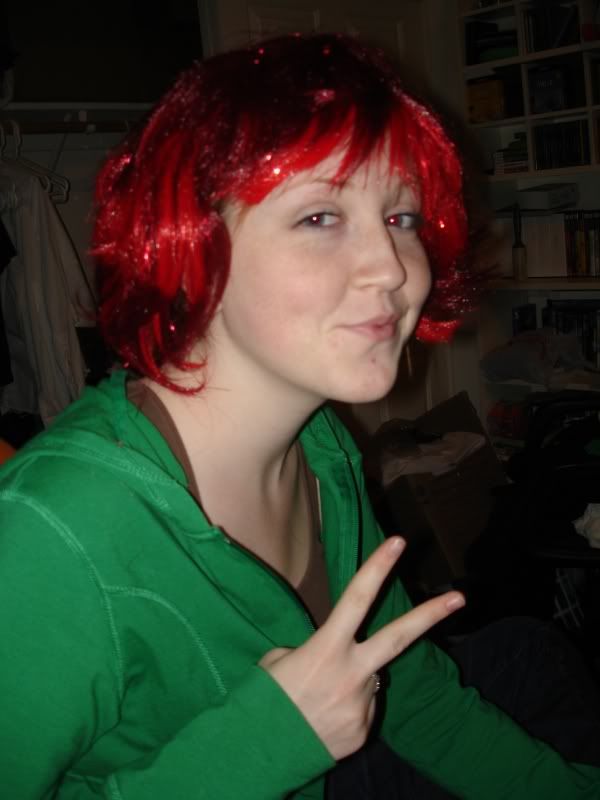
We decided that the first step would be wigs; we had to get wigs to match our fabrics to. We began shopping around online immediately. The blue, green, and orange were full fledged cosplay wigs we ordered from China or Japan (they came from different places). The red one was pretty standard and poorly made. It ended up getting scrapped in the final costume because she didn't want to wear it. She was a redhead anyway (as with the green-wig lovely lady and myself in blue) so it worked out fine. Naturally, once we got the wigs, we had to pose in a stereotypical manner as to honor their location of origin ... Yeah, maybe we're a little offensive. Shhh.
Once we had our wigs, we could shop for fabric!
We had also done some window shopping at the fabric stores to find patterns. I can't find the patterns at the moment (last year's stuff got packed away and my lethargy dictates that I not destroy the storage space in order to try and find them), but after browsing around online I do believe we used variation A of this B5554 pattern for our dresses. We altered the length for sexy purposes. For our waist cinches, we used M2337, but ditched the laces in the front in favor of eye hooks in the back.
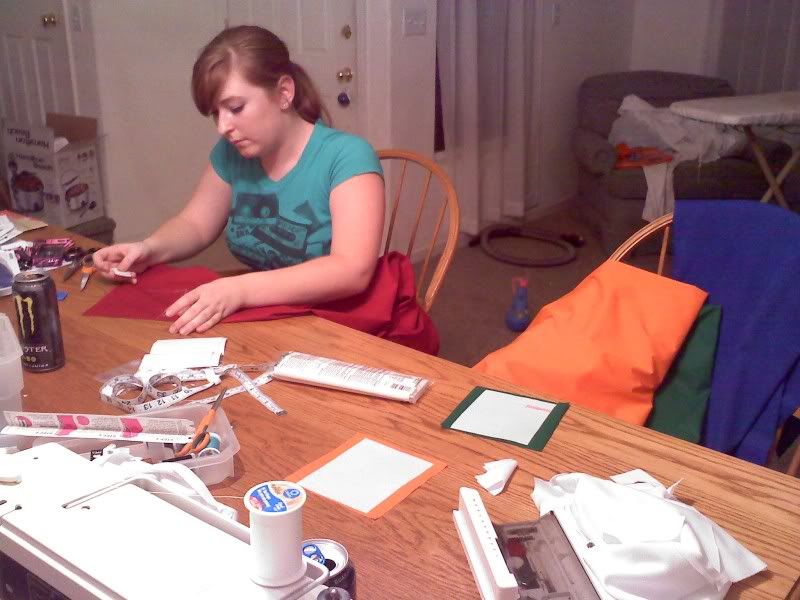
All that aside, there really isn't much to explain on these costumes. We fitted ourselves, sewed everything together, and rocked hard. But it was a very fun, social experience. I have a multitude of pictures of the in progress work, but I'll just make a handy list instead of bore you with too much rambling. They're in no particular order, just the way they got loaded in to my photobucket. Feel free to look at me and my friends being crazy, cracked out on energy drinks, and sewing like we belonged to a low-wage sweat shop. It was a good time, really.
Trying to style that horrid red wig was miserable. I was trying to sew, Megan did what she could for that terrible mop:.
The process for applying our crosses was also left to Megan and her beautiful OCD compulsions. Sometimes she had to enlist help though, for an extra set of hands. They were applied with iron on transfer material.
When the first dress was somewhat assembled, I took it for a test run. I was excited. We hadn't finished the seam up the back below the zipper just yet.
When we got another partway assembled (sans zipper), Megan took hers for a spin.
We bought ourselves grey turtlenecks and black leggings to go under the dresses. Also black opera-length gloves to substitute as our war gauntlets, but femininely! Completely covered, no bare skin, but it all ended up super sexy, I think. In case you can't tell, I was very, very excited with the way things were going.
And finally; ta da!
My original drawing had to be recreated once we had it all together. My wig ended up in braids because that thing was just way too much hair to handle while at work. I'd planned on us all having lipstick to match our hair as well, but someone decided she wasn't going to play along with the rest of us. It ended up getting scrapped like, the night before. Oh well. Some people just don't like dressup as much as I do, I guess.
Other finished shots of us at work:
You may notice that some of us (namely myself) have bracelets on with bangles. We used Shrinky Dinks to create little charms for ourselves. Each one of us had all four of the main Crashers as seen in their default and well known image. In between each one we each had our own collection of other charms. Mine included some of the little pets you can obtain. Some of the other girls wanted princesses on theirs, or the king himself. We each made our own so they were all a little different, but then we could show people who we were dressed up (sort of) as when they asked. I'll see if I can't get a picture of mine taken so you can see the detail; it's hanging in my car still. I'm quite proud of it.
Subscribe to:
Posts (Atom)